Install on AWS
This guide will perform a complete production-ready installation in your AWS environment using AWS CDK.
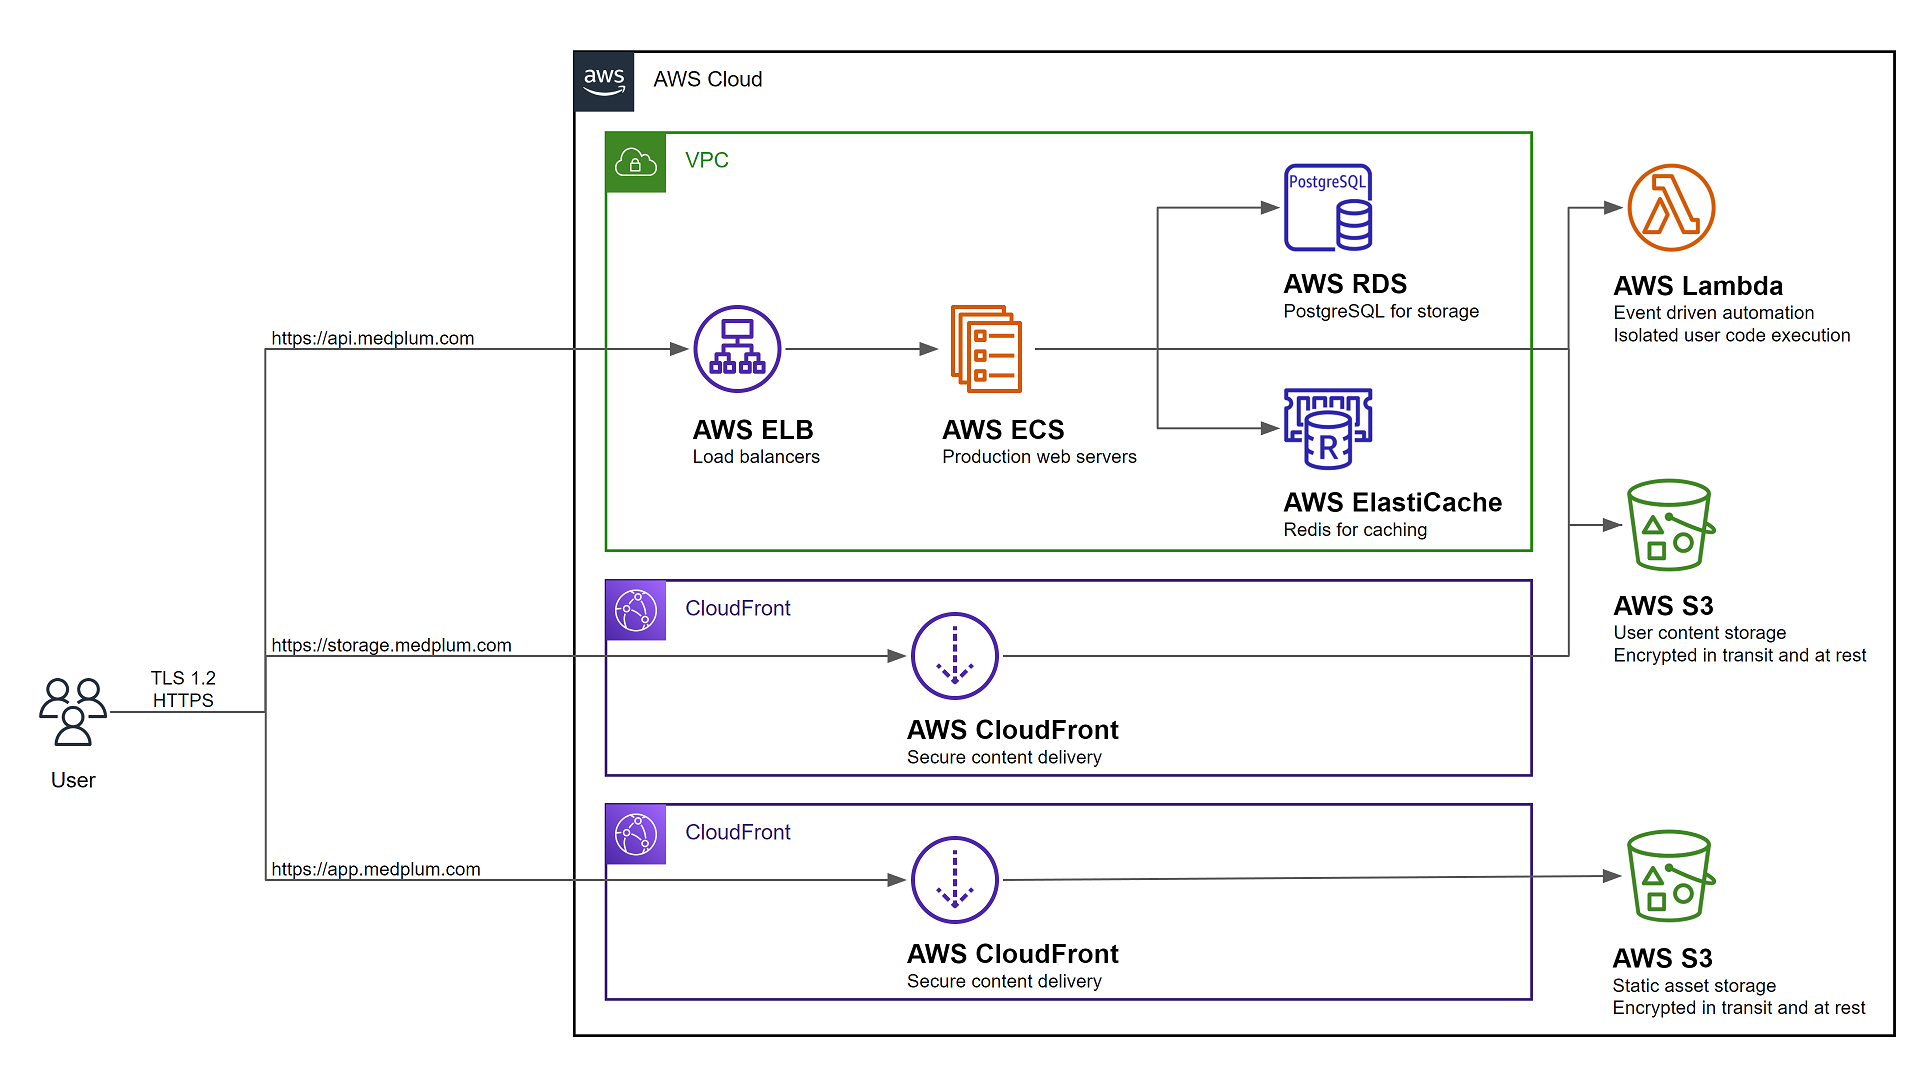
The resulting AWS configuration should look like the following:
Prerequisites
You will need permission to access the following AWS services:
| Service | Details |
|---|---|
| Elastic Compute Cloud (EC2) | Create a Virtual Private Cloud (VPC) and related security groups |
| Elasticache | Create a hosted Redis cluster for caching and task queue |
| Elastic Load Balancing (ELB) | Create a load balancer for server redundancy and high availability |
| Identity and Access Management (IAM) | Create service roles for the API server and bot lambdas |
| CloudFront | Securely deliver content with low latency and high transfer speeds |
| CloudWatch Logs | Create and manage log groups for server logs |
| Relational Database Service (RDS) | Create a hosted Postgres Aurora database |
| Route 53 | Create DNS entries for the services |
| Simple Storage Service (S3) | Host static web content, store and retrieve dynamic user content for file attachments |
| Secrets Manager | Store encrypted secret configuration details such as database credentials |
| Systems Manager (SSM) | Store configuration details |
| Web Application Firewall (WAF) | Protect your web applications or APIs against common web exploits and bots |
You will also need to setup your AWS credential file.
Create an SES email address
It is strongly recommended to setup an SES email address with production access, meaning that it can send email to any email recipient. Email is used to verify identities, send login instructions, and handle password reset requests.
Follow the Creating and verifying identities in Amazon SES guide to register an email address for system generated emails.
Deploy Bot Lambda Layer
Optional: If you intend to use Medplum Bots, you will need an AWS Lambda Layer.
You can use the deploy-bot-layer.sh script to automate this process:
./scripts/deploy-bot-layer.sh
See the Creating and sharing Lambda layers guide to learn more.
Run the init tool
Most AWS resources are automatically created using CDK, but some either cannot or are not recommended. Use the Medplum init tool to setup those resources and build the config file.
cd packages/infra
npm run init
Then follow the prompts.
Upon completion, the tool will:
- Generate a Medplum CDK config file (i.e., medplum.demo.config.json)
- Optionally generate an AWS CloudFront signing key'
- Optionally request SSL certificates from AWS Certificate Manager
- Optionally write server config settings to AWS Parameter Store
Make note of the CDK config file name.
See Config Settings for more details on each of the individual configuration settings.
CDK Synth
The synth step catches logical errors in defining your AWS resources.
Run CDK synth:
npx cdk synth -c config=my-config.json
CDK Bootstrap
Bootstrapping is the process of provisioning resources for the AWS CDK before you can deploy AWS CDK apps into an AWS environment.
Run CDK bootstrap:
npx cdk bootstrap -c config=my-config.json
Learn more about bootstrapping: https://docs.aws.amazon.com/cdk/latest/guide/bootstrapping.html
CDK Deploy
When you are ready to actually execute the CDK configuration, use the deploy command.
Run CDK deploy:
npx cdk deploy -c config=my-config.json
CDK Diff
If you make changes to the CDK config, you can use the diff command to see how it will change your AWS resources.
Run CDK diff:
npx cdk diff -c config=my-config.json
Deploy the app
After the AWS infrastructure is setup, you need to deploy the front-end web application.
Use the deploy-app.sh script with a APP_BUCKET environment variable:
TODO: Update the script to pull from a centralized config file rather than environment variable.
export APP_BUCKET=app.example.com
./scripts/deploy-app.sh
or
APP_BUCKET=app.example.com ./scripts/deploy-app.sh